In the midst of all the other finishing work for our new build, we had to look after making our well water potable. This is one of the few things that our builder leaves to the homeowner to complete. It makes sense considering how complex water systems can get depending on your location and personal needs. Even though each well or area may need different treatment elements to make water potable, the process to get there is fairly standard:
- Get the water out of the well
- Testing
- Primary treatment
- Testing
- Any additional treatment and retesting as required.
Here’s how our process played out … including what we paid!
1. Getting the Water Out of the Well
Our well had been drilled early on in our home building process. Now that the house was in place and electricity was flowing, it was time to get the water out of the well and into our fixtures. We called in our Plumber, Chris from Country Plumbing and started to work out the details. Brian had done some research and spoke with a few neighbours to get an idea of what we could need for drink-able water. From that research, he figured our water treatment configuration would look something like the picture below.
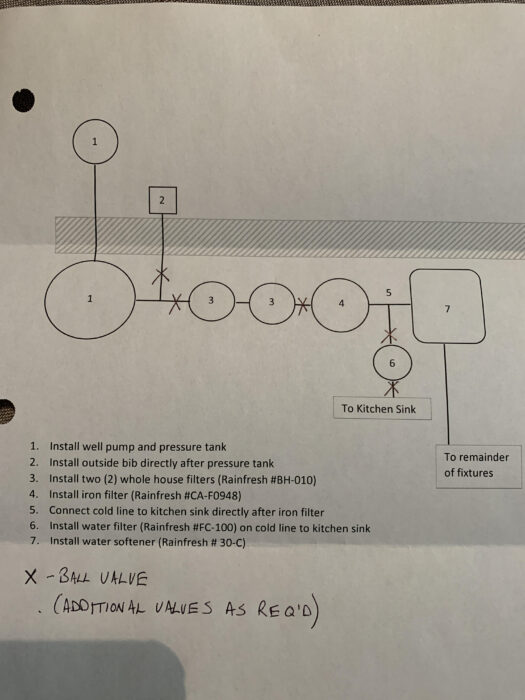
Of course all of this was a guess until we could get the water pumping and test it to see what was really required.
Well Pump & Pressure Tank Installation.
Before the well pump could be installed, we needed to extend the pipe coming out of the ground – the well head. Our grading wasn’t quite finished but we now knew where it would land so Chris was able to get the head extended. In no time he had the pump, pressure tank and electrical hooked up.
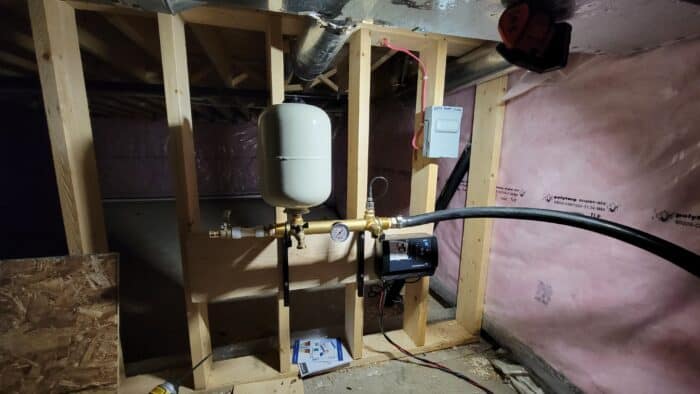
In addition, he made sure our fixtures were serviced and the water heater had been filled. Are you wondering why we needed the water heater filled? Well, that was necessary for the gas/propane inspection and we needed that to heat the house for final completion. Okay, back to the water …
2. Testing
Chris had taken some water samples for preliminary testing. The next step was ours. We had to come up to the house daily and run the water for an hour or so. After a week, we took more water samples to him so he could test and determine what we truly needed to make our water potable.
Here’s what we needed:
- Iron filter
- Water softener
- 2-stage filter, one for sediment and one for taste & odour.
- UV light for microbiological contaminants.
Regarding the UV light, while it may not have been a requirement from our water tests, my understanding is that most municipalities want to see them in your water treatment set-up to ensure your water stays safe. I haven’t found this in any posted documents from the few municipalities I’ve checked but it’s worth asking about. It seems like a good safety measure anyway.
3. Primary Treatment Installation
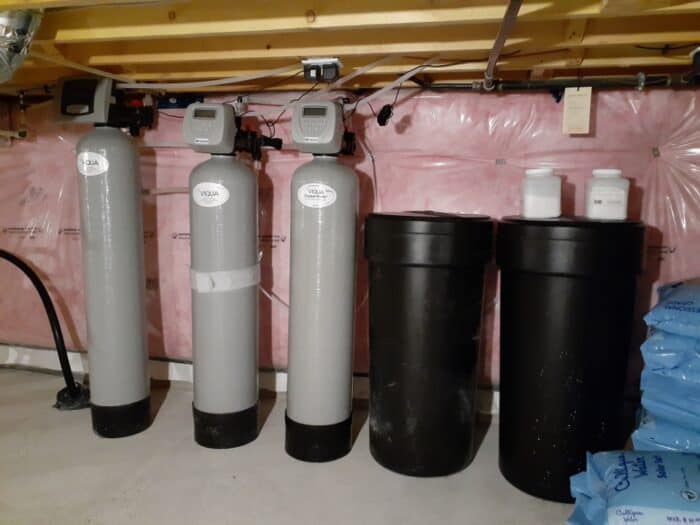
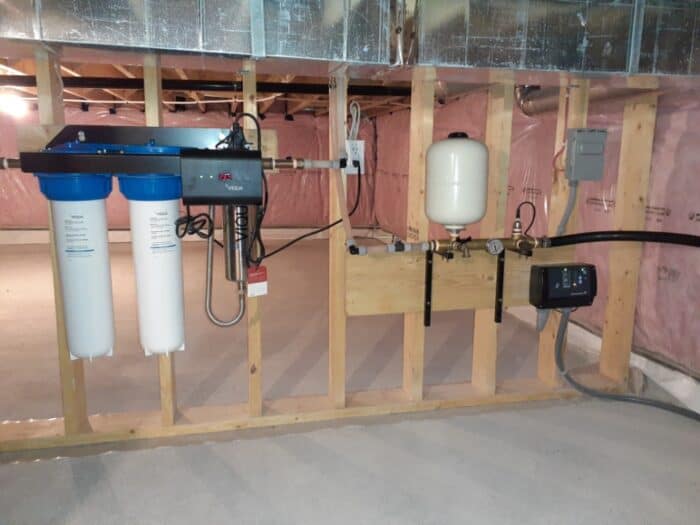
All of these components were installed on our Inspection Day, which meant that we’d have safe drinking water when we moved in! Chris did explain though that we’d need to run the water “generously” for a while to get the system flushed out. To be on the safe side, while the system was flushing out we bought a few jugs of bottled water to tide us over until the water ran clear.
We waited and waited! A few weeks went by and try as we may, the water still had a yellow-ish stain to it. We even pulled out our old pitcher water filter to see if one more filter would make a difference. It didn’t. It seemed so odd that more filtering wasn’t removing whatever was tinting our water; what could be in there that’s so small none of the filters was catching it? Tannins?
4. More Testing
We called Chris back; this time he had me take samples of water directly out of the well and from the tap. They looked identical! He also suspected there were tannins getting into our water but he sent the samples off to another lab for more complex testing to be sure. In the meantime we continued to buy water in jugs for drinking – UGH!
Our Test Results Come In
As we suspected, we had tannins in our water. What are tannins? Tannins are remnants of microscopic organic matter that stain the water. They’re the things that make inland lakes, rivers and streams look brownish or greenish. I don’t know the exact cause of tannins getting into our water since the well casing goes down well into the rock. I do know that we’re not the only ones with this issue in our area. My guess is that either the casing isn’t deep enough, or the type of rock we live on is more porous which could make organic elements better able to travel deeper and reach our aquifer.
Whatever the reason, we needed a tannin remover. So, we ordered that.
A Note About Water Taste
While we waited for the tannin filter to come in, we started thinking about how our water might taste after all this processing. Our water softener and the tannin remover both use solar salt as the medium for regeneration. We started to ask questions like:
- Wow isn’t that a lot of salt getting into our drinking water?
- Isn’t salt bad for us?
- How is that going to taste? We’ve lived with water softeners before and the water tasted awful.
We decided to dig a little deeper on the effects of the salt being used and explore possibilities in case our water still tasted terrible.
We considered:
- Determining if the levels of salt remaining in the water were actually dangerous
- Buying and lugging big water jugs for the next 20 or so years
- Installing an RO system just on the kitchen tap.
We checked multiple sources of information on the internet – being sure to also find information not provided by someone trying to sell water systems – to see what we could learn about the salt levels in treated water. The consensus is that there isn’t enough dissolved salt remaining in modern water cleaning appliances to be harmful to humans or animals.
The type of salt you use in your water softener and other cleaners, does matter though and Solar Salt appears to be the big winner for being less trouble. Solar Salt doesn’t contain additional elements or binders that help manufacturers form the salt into pellets or other forms. It also dissolves slower, resists turning to mush, and leaves less brine residue to muck up the tank. As an added bonus, its manufacturing process appears to be better for the environment.
But still the question remained, what if the water tastes awful at the end of all this?
Buying Water by the Jug – It’s bad enough that Brian will be lugging bags of salt down into the crawl space. I didn’t want him to be lugging jugs of water into the house too. Plus, I’m not in love with the idea of my water sitting in plastic jugs. BPA free or not, there’d just be another chemical potentially leaching into it. Of course jugs are better than nothing, it’s just disappointing to resort to buying water when we have an abundant supply right under us.
Reverse Osmosis (RO) – Given the popularity and affordability of reverse osmosis, whole home or just on one tap, my reasons for discounting it may seem in um… weird. For a very long time it was just an “energy thing.” I couldn’t describe why I was opposed to RO, I just was. About the only way I could describe it is that it leaves me more thirsty than I am before I drink it. Then one day I attended a kombucha brewing class. During our discussion of troubleshooting our brews, the topic of water source came up. It turns out that RO can impact the health of your brew. This is due to the lack of minerals remaining in the water.
After a bit of research online (thank you Google), I learned that reverse osmosis removes up to 98% of dissolved solids from water. That’s a lot of bad stuff like chlorine, arsenic and VOCs. Unfortunately that means that it also takes the dissolved minerals that make water so good for us. That got me thinking: if it can weaken or kill my kombucha over time, couldn’t it do the same thing for my gut flora?
Brian had a much more grounded reason for not exploring RO further. It wastes water to make water. Sometimes it can waste 3-5 gallons or more to make 1 gallon of water depending on the age of the membrane in the unit. You can find out more about that here and in several sources online.
If you have RO, or are thinking of getting a reverse osmosis system it’s entirely your choice and there are a number of good reasons for it. You might at least consider adding a remineralization unit to it or adding trace minerals back into your drinking water.
Now back to our water story …
5. Additional Water Treatment
Once the Tannin Remover was installed and the system had been recharged, we finally had clear water! All of that concern and research was unnecessary though, the water tastes great! Finally we have clear, safe, delicious water for all of our fixtures!
Before I leave, and to be fair to RO and any other water filtration methods, I’ve discovered that our iron filter, water softener and tannin remover can also remove a lot of the good stuff from our well water. UGH! Now I occasionally add a drop or two of trace minerals to my drinking water or run it through our Santevia Classic Alkaline Water Filter Pitcher to be sure I’m getting some of the trace minerals my body needs.
What to Budget for Your Water System
What it takes to have clean, potable water into a home is determined on a site by site, and personal taste basis. I can’t tell you what yours might cost but I can give you our budget and actual pricing.
When we were working out our budget we had a very “guessy” line item for the well and water treatment. It was a measly $10,000. Here’s what we actually paid for safe, palatable drinking water throughout our home:
| Item/Stage | Cost |
| Well | $4,600.00 |
| Well pump, pressure tank, well head extension | $4,902.00 |
| Iron filter, Water Softener, 2-Stage Filter, UV treatment | $6,820.00 |
| Tannin Remover | $3,592.00 |
| GRAND TOTAL | $19,914.00 |
We are aware that there are combination units available for the iron and water softening which could have saved a little bit of money. Sadly, our crawlspace is too short for the units to fit. I’m not sure that option would have really saved us much in the long run anyway.
Given that we hope to be in the house for the next 20 years – at least – it works out to about $995.00/year. WOW! That quick math actually made me feel better believe it or not! Compared to what we were paying in the city … it’s a deal! 😉
Clean, Tasty Water!
What’s Next for Our Water System?
Even though the heavy lifting (uh make that heavy-spending) is complete, we still need to pay attention to our water. Maintenance of the system will require regular top-ups of salt in the iron filter, water softener and the tannin remover as well as annual filter replacement and UV light maintenance. We’ll also be completing annual water tests through our local health unit to make sure we continue to protect our investments in our home and in our health.
2 thoughts on “Making Our Well Water Drinkable”
Leave a Reply
Recent Posts
7 Totally Selfish Reasons to Choose Native Plants for Your Gardens
Grab a cup (or glass) of your favorite beverage, and let's delve into what I’ve learned so far about why it's incredibly important and wildly selfish to embrace landscaping with locally native...
Exploring the differences, benefits and drawbacks of Broadcast Sowing and Frost Seeding for Native plants.


Thank you for this thorough review. Lots of things to consider. Funny how, when living in the city, you take the water supply as a guaranteed item. Nothing to think about. Turn on a tap and presto, clean, safe water comes out. It’s amazing, when on a well, how our water can be so different across our province and what we, the homeowner, need to do to get safe drinking water to our home.
I’m not sure if you have a location on you website to ask or if you take requests, but I would like to hear about your HVAC ideas/experiences – furnace, heat pump, air conditioner, wood stove etc.
Thanks again. Your posts have been quite helpful.
Marco
Hey Marco, thanks for taking the time to comment. You just did make a request, let me see what I can do about that.